Eyeshadow Guide⁚ A Comprehensive Plan
Embark on a journey to master eyeshadow application! This comprehensive guide unlocks the secrets to achieving stunning eye looks‚ whether you’re a beginner or seeking to refine your technique. From basic steps to advanced artistry‚ discover tips and tricks for every eye shape.
Understanding Eyeshadow Basics
Eyeshadow is a cornerstone of eye makeup‚ offering endless possibilities for enhancing your natural beauty and expressing your personal style. At its core‚ eyeshadow involves applying pigments to the eyelids to add color‚ depth‚ and dimension. It’s a versatile tool that can be used to create subtle‚ everyday looks or dramatic‚ statement-making effects.
Understanding the basic terminology is essential. The lid refers to the area from the lash line to the crease‚ the crease is the fold above the lid‚ and the brow bone is the area just below the eyebrow. Different eyeshadow finishes‚ such as matte‚ shimmer‚ and satin‚ offer varied textures and intensities. Matte shadows provide a smooth‚ non-reflective finish‚ while shimmer shadows add a touch of radiance.
Selecting the right eyeshadow formula is also crucial. Powder eyeshadows are the most common and are easy to blend‚ while cream eyeshadows offer a more intense color payoff and a dewy finish. Eyeshadow sticks are a convenient option for on-the-go application. By grasping these fundamentals‚ you’ll be well-equipped to navigate the world of eyeshadow and create captivating eye looks.
Essential Eyeshadow Tools⁚ Brushes and Applicators
Achieving a flawless eyeshadow application hinges not only on the quality of your eyeshadow but also on the tools you use. Investing in a set of essential eyeshadow brushes is crucial for precise placement‚ seamless blending‚ and professional-looking results.
A flat shader brush is a must-have for packing color onto the eyelid. Its dense bristles allow for even distribution and maximum color payoff. A blending brush‚ with its soft‚ fluffy bristles‚ is essential for diffusing harsh lines and creating a smooth‚ gradient effect. A crease brush‚ typically tapered or angled‚ is designed for precise application of color in the crease‚ adding depth and dimension to the eyes.
For detail work‚ such as highlighting the inner corner or applying eyeshadow along the lower lash line‚ a small detail brush is invaluable. Angled brushes can also be useful for smudging eyeliner or creating a soft wing. When selecting brushes‚ opt for those with soft‚ high-quality bristles that won’t irritate the delicate skin around the eyes. Regularly cleaning your brushes is essential for hygiene and optimal performance.
Preparing the Eyelid⁚ Priming for Success
Before diving into eyeshadow application‚ prepping your eyelids is a crucial step often overlooked‚ yet fundamental for achieving a long-lasting‚ vibrant‚ and crease-free finish. Priming creates a smooth canvas‚ ensuring that your eyeshadow adheres evenly and prevents it from creasing‚ fading‚ or smudging throughout the day.
Begin by ensuring your eyelids are clean and dry. Gently cleanse the area to remove any excess oil or residue. Next‚ apply a thin layer of eyeshadow primer to your entire eyelid‚ from lash line to brow bone. A pea-sized amount is generally sufficient for both eyes.
Allow the primer to set for a minute or two before proceeding with your eyeshadow application. This allows the primer to fully absorb into the skin and create a tacky base for the eyeshadow to grip onto. If you don’t have an eyeshadow primer‚ a concealer can be used as an alternative. However‚ eyeshadow primers are specifically formulated to enhance eyeshadow wear and prevent creasing‚ making them the ideal choice for optimal results.
Choosing the Right Eyeshadow Colors
Selecting the right eyeshadow colors is paramount for creating captivating eye looks that complement your features and express your personal style. Consider your eye color‚ skin tone‚ and the occasion when making your color choices.
For those with brown eyes‚ a wide range of eyeshadow shades will enhance your natural beauty. Earthy tones like browns‚ golds‚ and bronzes create a warm and inviting look‚ while jewel tones like emerald green‚ sapphire blue‚ and amethyst purple add a touch of drama.
If you have blue eyes‚ warm eyeshadow colors like peach‚ coral‚ and terracotta will create a stunning contrast. Gold and bronze shades will also make your blue eyes sparkle. Avoid cool-toned shades like blue and gray‚ as they can wash you out.
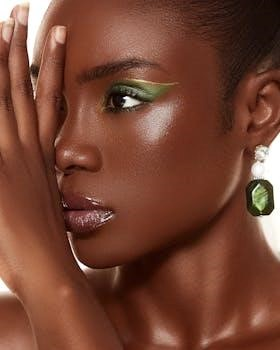
Green eyes look gorgeous with warm-toned purples‚ mauves‚ and pinks. These shades will bring out the green in your eyes and create a captivating effect. Copper and bronze shades also complement green eyes beautifully.
Experiment with different color combinations to discover your favorites and create unique eye looks that reflect your personality.
Eyeshadow Application Techniques⁚ Step-by-Step Guide
Mastering eyeshadow application is achievable with a systematic approach. Start by priming your eyelids to create a smooth canvas for your eyeshadow and ensure long-lasting wear.
Next‚ choose your eyeshadow colors based on your desired look. A classic three-color combination includes a light base shade‚ a medium transition shade‚ and a dark crease shade.
Apply the light base shade all over your eyelid‚ from lash line to brow bone. This will even out your skin tone and provide a foundation for the other colors.
Using a blending brush‚ apply the medium transition shade to your crease‚ blending it upwards towards your brow bone. This will add depth and dimension to your eyes.
With a smaller‚ more precise brush‚ apply the dark crease shade to the outer corner of your eye‚ blending it inwards along your crease. This will create a smoky effect and enhance the shape of your eyes.
Finally‚ blend all the colors together seamlessly‚ ensuring there are no harsh lines or visible edges.

Blending Techniques for a Seamless Finish
Achieving a seamless eyeshadow finish is crucial for a professional‚ polished look. The key to successful blending lies in using the right tools and techniques. Invest in a high-quality blending brush with soft‚ fluffy bristles. These brushes are designed to gently diffuse eyeshadow colors without creating harsh lines.
Start with a clean blending brush‚ free from any product buildup. This will prevent the colors from becoming muddy or uneven. Use windshield wiper motions‚ gently sweeping the brush back and forth along the edges of your eyeshadow.
Apply light pressure‚ allowing the brush to do the work. Avoid pressing too hard‚ as this can disrupt the placement of your eyeshadow and create a messy look. Focus on blending the edges of each color‚ gradually merging them together.
If you find that your eyeshadow is blending away too much‚ add a small amount of the transition shade back to your crease and re-blend. This will help to maintain definition while still achieving a seamless finish. Remember‚ practice makes perfect!
Eyeshadow Looks for Beginners⁚ Simple and Easy
For those just starting their eyeshadow journey‚ simplicity is key. A single-shade wash is a fantastic way to enhance your eyes without complex techniques. Choose a neutral shade that complements your skin tone and apply it evenly across your entire eyelid‚ from lash line to brow bone. This creates a subtle yet polished look perfect for everyday wear.
Another easy option is the two-toned look. Select a light base color and apply it all over the lid. Then‚ take a slightly darker shade and apply it to the outer corner of your eye‚ blending it gently into the crease. This adds depth and dimension without requiring intricate blending skills.
Cream eyeshadow sticks are also incredibly user-friendly. Simply swipe the stick across your eyelid and blend with your finger or a brush. They come in a variety of colors and finishes‚ making it easy to experiment with different looks.
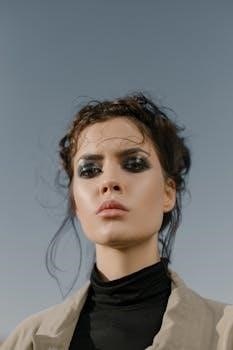
Eyeshadow Looks⁚ Smoky Eyes
The smoky eye is a timeless classic‚ perfect for adding drama and allure to your look. Start with a base color all over the lid. Next‚ apply a medium shade to the lid‚ blending it towards the crease. Then‚ use a darker color on the outer third of the lid and along the lash line to create depth.
The key to a great smoky eye is blending. Use a fluffy brush to soften the edges of each color‚ creating a seamless transition. Don’t be afraid to layer and build up the color gradually until you achieve your desired intensity.
For a classic smoky eye‚ use shades of gray‚ brown‚ or black. However‚ you can also experiment with other colors‚ such as burgundy‚ navy‚ or green‚ to create a unique and modern twist. Finish the look with eyeliner and mascara for added definition.
Eyeshadow for Different Eye Shapes⁚ Hooded Eyes
Hooded eyes‚ characterized by a fold of skin that covers the eyelid when the eye is open‚ require specific eyeshadow techniques to enhance their beauty. The key is to create dimension and lift‚ making the eyes appear more open and defined.
Begin by applying a matte base color all over the lid‚ extending it slightly above the crease. This will create a canvas for the rest of your eyeshadow application. Next‚ apply a darker shade to the outer corner of the eye‚ blending it upwards and outwards towards the brow bone. This will create the illusion of a deeper crease.
Avoid applying dark colors directly on the lid‚ as this can make the eyes appear smaller. Instead‚ focus on highlighting the brow bone with a light‚ shimmery shade. This will draw attention to the upper part of the eye and create a lifted effect.
Eyeliner can also be used to define the eyes‚ but it’s important to keep it thin and close to the lash line. Avoid heavy eyeliner‚ as this can overwhelm hooded eyes.
Eyeshadow for Different Eye Shapes⁚ Almond Eyes
Almond eyes‚ with their elegant‚ elongated shape‚ are considered one of the most versatile eye shapes for eyeshadow application. Their natural symmetry allows for a wide range of looks‚ from subtle enhancements to bold‚ dramatic creations.
To accentuate the almond shape‚ focus on creating depth and dimension. Start by applying a medium shade all over the lid‚ from lash line to crease. This will serve as a base for the rest of your eyeshadow application.
Next‚ apply a darker shade to the outer corner of the eye‚ blending it inwards towards the center of the lid. This will create a smoky effect and add definition to the almond shape. For a more dramatic look‚ extend the darker shade slightly beyond the outer corner of the eye‚ creating a winged effect.
Highlight the inner corner of the eye with a light‚ shimmery shade to brighten the eyes and make them appear more open. Eyeliner can be used to further define the eyes‚ but it’s important to keep it balanced and proportional to the almond shape.
Troubleshooting Common Eyeshadow Mistakes
Even with the best intentions‚ eyeshadow application can sometimes go awry. Let’s address some common pitfalls and their solutions.
Fallout Frenzy⁚ Eyeshadow fallout‚ those pesky specks that land on your cheeks‚ can be avoided. Tap off excess product from your brush before applying and use a gentle patting motion instead of sweeping. Consider applying eyeshadow before foundation to easily clean up any fallout.
Muddy Mess⁚ Blending is crucial‚ but over-blending can result in a muddy‚ undefined look. Use a clean blending brush and focus on softening the edges of colors‚ rather than swirling everything together.
Uneven Application⁚ Ensure even color payoff by priming your lids beforehand. Apply eyeshadow in thin‚ buildable layers‚ rather than packing on too much product at once.

Harsh Lines⁚ Avoid harsh lines by using a light touch and blending thoroughly. Focus on softening the transitions between colors for a seamless finish;
Color Clashes⁚ Experiment with color combinations‚ but be mindful of clashing shades. Refer to color theory principles for guidance on harmonious pairings.
Tips for Long-Lasting Eyeshadow Wear
Achieving eyeshadow that lasts throughout the day requires a few strategic steps; Here are some tips for maximizing your eyeshadow’s staying power⁚
Prime Time⁚ Eyelid primer is your best friend. It creates a smooth canvas‚ prevents creasing‚ and provides a tacky base for eyeshadow to grip onto. Apply a thin layer evenly across your lids before any eyeshadow application.
Layering is Key⁚ Build up your eyeshadow in thin layers‚ rather than applying one thick coat. This allows the product to adhere better and prevents it from sliding off.
Setting Spray Savior⁚ Once you’ve completed your eyeshadow look‚ a light mist of setting spray can lock everything in place. Choose a setting spray specifically designed for makeup longevity.
Cream Shadow Base⁚ For extra staying power‚ consider using a cream eyeshadow as a base. Cream shadows tend to be more long-wearing than powder shadows and can help to intensify the color of your powder shadows.
Waterproof Formulas⁚ If you’re prone to oily lids or live in a humid climate‚ opt for waterproof or long-wearing eyeshadow formulas.